Battery switch on travel trailer function is crucial for managing your RV’s power. Understanding how your battery switch works – whether it’s a single-pole, double-pole, or double-pole double-throw type – is key to safe and efficient power usage. This guide will walk you through the different types, their locations, operation, troubleshooting, and maintenance, ensuring you’re prepared for any situation on the road.
We’ll cover everything from safely operating the switch and identifying common problems to integrating it with your solar panels and other electrical components. By the end, you’ll be a battery switch pro, confident in handling any power situation in your travel trailer.
Battery Switch Types in Travel Trailers

Choosing the right battery switch for your travel trailer is crucial for managing your power sources effectively and safely. Understanding the different types available will help you make an informed decision based on your specific needs and setup. This section will Artikel the common types, their pros and cons, and help you determine which is best for your RV.
Single-Pole Battery Switches
A single-pole battery switch is the simplest type. It controls the connection of a single battery to the trailer’s electrical system. This means you can either connect or disconnect one battery at a time. Think of it as a simple on/off switch for your house battery.
Double-Pole Battery Switches
Double-pole switches control two batteries independently. This allows you to isolate each battery separately, which is useful if you have a deep-cycle house battery and a starting battery for your vehicle. You can disconnect one while keeping the other connected. This added level of control enhances safety and allows for targeted battery management.
Double-Pole Double-Throw (DPDT) Battery Switches
These switches offer the most advanced control. A DPDT switch allows you to connect either one battery or both batteries to the trailer’s electrical system. You might use this setup to charge both batteries simultaneously from shore power or to switch between two different battery banks. This provides the greatest flexibility in managing multiple power sources.
Comparison of Battery Switch Types
| Feature | Single-Pole | Double-Pole | Double-Pole Double-Throw (DPDT) |
|---|---|---|---|
| Number of Batteries Controlled | One | Two (independent control) | One or Two (selectable) |
| Complexity | Simple | Moderate | Complex |
| Cost | Low | Medium | High |
| Application Suitability | Small trailers with single battery | Trailers with separate house and starting batteries | Trailers with complex battery setups, multiple banks, or advanced charging needs |
Battery Switch Location and Accessibility
Finding your travel trailer’s battery switch quickly can be a lifesaver, whether you’re dealing with a dead battery or need to disconnect power for maintenance. Knowing its location and ensuring easy access is crucial for both convenience and safety.The placement of a battery switch varies significantly depending on the travel trailer’s make, model, and year. Some manufacturers might place it inside a convenient compartment near the entry door, while others might locate it outside, often near the battery itself, under a hinged access panel.
Less common locations include within a dedicated electrical bay or even tucked away under a bed or storage area. These less accessible locations, however, can present significant challenges during emergencies or routine maintenance.
Optimal Battery Switch Placement
Easy access to the battery switch is paramount for several reasons. In case of an emergency, like a short circuit or fire, being able to quickly disconnect the battery can prevent further damage or even injury. Regular maintenance tasks, such as checking battery voltage or cleaning terminals, are also made significantly easier with readily accessible switches. Additionally, a well-placed switch safeguards against accidental activation or damage.
Diagram of Ideal Battery Switch Placement
Imagine a diagram showing a travel trailer’s exterior. The ideal placement for the battery switch is shown on the outside of the trailer, close to the battery location but under a weatherproof, lockable compartment. This compartment is hinged at the bottom, opening downward to allow easy access while preventing the ingress of water, dirt, or debris. The compartment is positioned slightly elevated from the ground to prevent accidental contact with mud or water spray.
The switch itself is clearly labeled and positioned within easy reach, not obstructed by other equipment or components. The battery itself is also shown within its own secure and weatherproof housing nearby. The overall impression is one of safety, accessibility, and protection from the elements. This placement ensures that the switch is easily reachable while still offering protection against harsh weather conditions and accidental operation.
Operating the Battery Switch: Battery Switch On Travel Trailer Function
Operating your travel trailer’s battery switch is a straightforward process, but safety should always be your top priority. Improper handling can lead to serious consequences, including injury or damage to your equipment. This section Artikels the correct procedures and crucial safety measures to ensure a smooth and safe experience.
Before you even touch the switch, take a moment to assess the situation. Make sure the area is well-lit and you have a clear workspace. Avoid working near flammable materials. Always wear appropriate safety glasses to protect your eyes from potential sparks or battery acid splashes. Having a pair of insulated gloves is also a good idea to protect your hands from electrical shocks.
Battery Switch Operation Procedure
The following steps detail how to safely operate a typical battery switch. Remember that the specific location and appearance of your switch may vary slightly depending on your travel trailer’s model and manufacturer. Consult your owner’s manual for precise instructions if needed.
- Identify the Switch: Locate the battery switch clearly labeled as such, often found near the battery itself or inside a designated compartment.
- Inspect the Switch: Check the switch for any signs of damage, corrosion, or loose connections before operating it. If you notice anything unusual, do not proceed and consult a qualified technician.
- Turn the Switch OFF (if necessary): If the switch is currently in the “ON” position, carefully turn it to the “OFF” position. This disconnects the battery from the trailer’s electrical system.
- Turn the Switch ON: Once you’re ready to power the system, carefully turn the switch to the “ON” position. You should hear a definite click indicating that the connection has been made.
- Verify Power: Check that your appliances are receiving power. Turn on lights or other devices to confirm the battery is properly connected and functioning.
Safety Precautions When Working with Batteries and Electrical Systems
Working with batteries and electrical systems presents inherent risks. Following these precautions is crucial to prevent accidents and injuries.
- Always wear safety glasses and insulated gloves.
- Ensure good ventilation to avoid inhaling potentially harmful gases emitted by batteries.
- Never touch the battery terminals with bare hands or conductive materials.
- Avoid sparks or flames near the battery to prevent explosions. Battery acid is corrosive and can cause serious damage to skin and eyes.
- If working with a lead-acid battery, be mindful of potential acid spills and have baking soda on hand to neutralize any spills.
- If you are unsure about any aspect of the process, consult a qualified electrician or RV technician.
Potential Hazards of Incorrect Battery Switch Operation
Incorrect operation of the battery switch can lead to several problems. Understanding these potential hazards will help you operate the switch safely and efficiently.
- Electrical Shock: Improper handling can result in electrical shock, potentially causing injury or even death.
- Battery Damage: Incorrect switching can damage the battery, shortening its lifespan or rendering it unusable.
- Appliance Malfunction: Erroneous operation might lead to malfunctions or damage to your trailer’s electrical appliances.
- Fire Hazard: In some cases, incorrect switch operation can create a fire hazard, especially if there are loose connections or damaged wiring.
- System Failure: Improper use can lead to complete system failure, leaving you without power in your travel trailer.
Troubleshooting Common Battery Switch Issues
Your travel trailer’s battery switch is a crucial component, and problems with it can leave you stranded. Fortunately, most issues are easily diagnosed and fixed with basic tools. Understanding common problems and troubleshooting steps will help you maintain power and enjoy your adventures.
Battery switch problems usually stem from three main culprits: corrosion, loose connections, and switch failure itself. Corrosion builds up over time, hindering electrical conductivity. Loose connections, often due to vibration during travel, interrupt the circuit. Finally, the switch itself can fail due to wear and tear or exposure to the elements.
Corrosion Diagnosis and Resolution
Corrosion is a common enemy of electrical connections. It creates a film that resists the flow of electricity, leading to weak or no power to your trailer’s batteries. You’ll often see a whitish or greenish buildup on the terminals and switch itself. To resolve this, carefully clean the terminals and switch contacts using a wire brush and a battery terminal cleaner.
Apply a corrosion inhibitor after cleaning to prevent future buildup. Remember to disconnect the negative battery cable before cleaning to avoid short circuits. Thoroughly clean the area, ensuring all corrosion is removed for optimal electrical contact.
Loose Connection Identification and Repair
Loose connections, often caused by vibrations during towing, can interrupt the flow of electricity to your batteries. This can manifest as intermittent power or a complete lack of power. Check all connections at the battery terminals and the battery switch itself. Tighten any loose nuts and bolts, ensuring a secure connection. If the bolts are stripped or the terminals are damaged, replace them.
Consider using anti-vibration washers or locking nuts to prevent future loosening. Always visually inspect for any damage to the wires themselves, and replace them if necessary.
So, you’re planning a trip? Awesome! Don’t forget travel insurance; it’s a lifesaver. Check out Aon travel insurance for comprehensive coverage. They’ve got options for everything from lost luggage to medical emergencies. Speaking of comprehensive, another great resource for finding the right plan is Aon travel insurance , which offers a user-friendly website to compare different policies and find the best fit for your needs and budget.
Seriously, don’t skip this step – peace of mind is priceless!
Battery Switch Failure Detection and Replacement
If cleaning the connections and addressing corrosion doesn’t solve the problem, the switch itself might be faulty. A failed switch may show no signs of life when you try to operate it, or it might click but not engage the circuit. The only solution here is to replace the switch. Before purchasing a replacement, note the amperage rating of your existing switch to ensure compatibility.
Replacing the switch involves disconnecting the battery cables, removing the old switch, and carefully installing the new one, ensuring proper connection of all wires. Remember to follow the manufacturer’s instructions for your specific switch model.
Troubleshooting Flowchart
A visual guide can simplify the diagnostic process. The following flowchart illustrates a systematic approach to troubleshooting a malfunctioning battery switch:
Start → Check for corrosion on terminals and switch → (Yes: Clean and apply inhibitor; No: Continue) → Check for loose connections → (Yes: Tighten or replace; No: Continue) → Test switch operation → (Functions correctly: Check wiring elsewhere; Does not function: Replace switch).
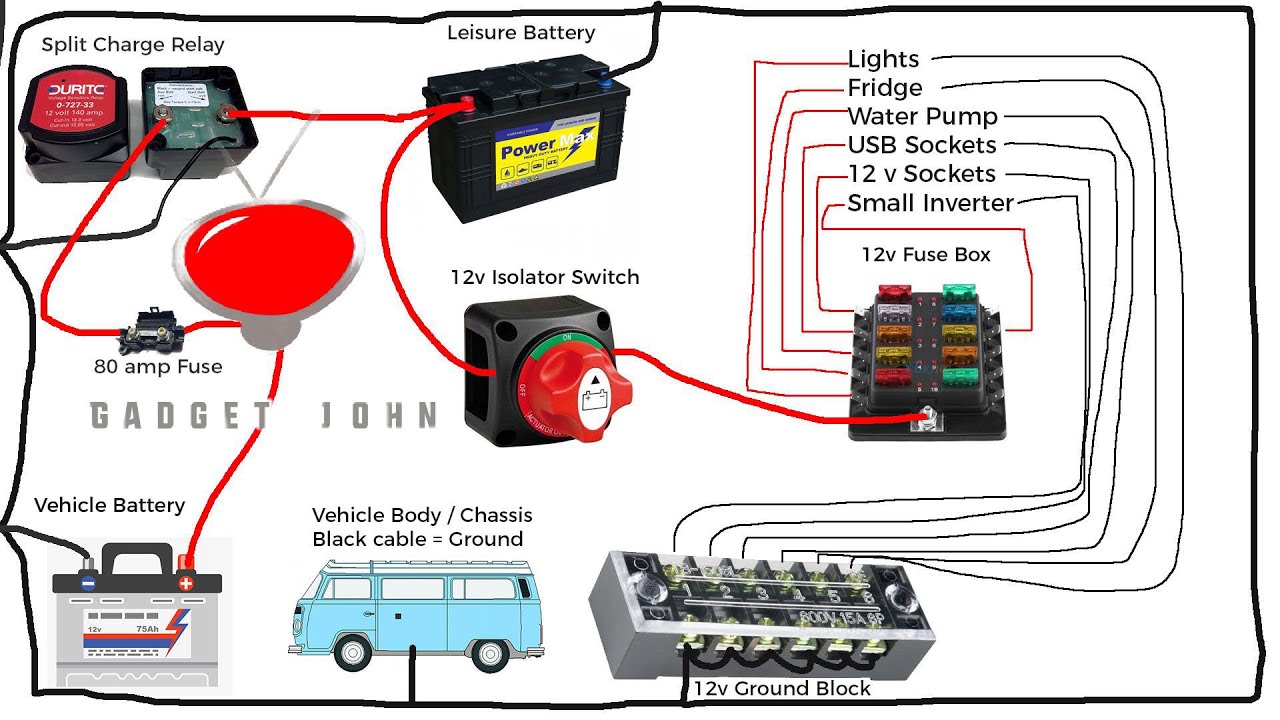
Battery Switch and Electrical System Integration
Your travel trailer’s battery switch isn’t just a simple on/off switch; it’s a crucial component that manages the flow of power throughout your entire electrical system. Understanding its interaction with other parts is key to preventing electrical problems and ensuring a reliable power supply. This section will detail how the battery switch works in conjunction with solar panels, the converter, and the inverter to keep your RV running smoothly.The battery switch acts as the central control point for your trailer’s 12-volt DC system.
It determines which components have access to power from your house batteries, and importantly, prevents accidental draining of those batteries when they aren’t needed. This is especially critical if you have multiple power sources, like solar panels, connected to your system. Improper management can lead to overloads, damaged components, and even fires.
Power Flow and Component Interaction
Imagine your battery switch as a traffic controller for electricity. When it’s in the “on” position, it allows power to flow from your house batteries to other DC-powered devices in your trailer, such as lights, water pumps, and refrigerators (if it runs on 12V DC). When it’s “off,” it disconnects the batteries, preventing any drain. This is especially useful for long-term storage when you want to preserve battery life.Consider a system with solar panels, a converter, and an inverter.
The solar panels charge your house batteries directly. The converter takes shore power (120V AC) or generator power and converts it to 12V DC to charge the batteries and power the 12V DC systems in the trailer. The inverter converts the 12V DC power from the batteries into 120V AC power for appliances requiring AC power. The battery switch controls the path of the 12V DC power from the batteries, enabling or disabling power to the converter’s charging function, and to the 12V DC appliances and the inverter.
If the switch is off, the solar panels will still charge the batteries (unless a separate solar charge controller is set to prevent this), but the batteries won’t power anything else.
Preventing Overloads
The battery switch plays a vital role in preventing overloads. By isolating the batteries when not in use, it reduces the risk of drawing excessive current from them. Overloads can damage components and potentially cause fires. The switch acts as a safety mechanism, preventing potentially dangerous situations. For example, if you have a large number of appliances running simultaneously, exceeding the capacity of your batteries, the battery switch doesn’t directly prevent this, but by turning the switch off, you isolate the batteries from the load.
Properly sized wiring and fuses further protect against overloads.
Diagram of Electrical System
[Imagine a diagram here showing a simple circuit. It would show the house batteries, connected to the battery switch. From the switch, lines would lead to: 1) a group of 12V DC appliances (lights, pump, etc.), 2) a converter (with an incoming line for shore power/generator power), 3) solar panels (with a solar charge controller), and 4) an inverter.
Arrows would indicate the direction of power flow. Labels would clearly identify each component and its function. The diagram would visually demonstrate the central role of the battery switch in managing power distribution.]
Maintaining the Battery Switch
Keeping your travel trailer’s battery switch in good working order is crucial for reliable power and preventing costly repairs. Regular maintenance ensures your system operates smoothly and extends the lifespan of the switch itself, saving you time and money in the long run. Neglecting maintenance can lead to corrosion, poor connections, and ultimately, switch failure.Regular maintenance involves a simple cleaning and inspection schedule, along with some preventative measures.
Think of it like changing the oil in your car – a small amount of effort prevents big problems down the road.
Battery Switch Cleaning and Inspection Schedule
A good rule of thumb is to inspect your battery switch at least twice a year, once before your first trip of the season and again before storing your trailer for the winter. This allows you to catch any issues early on. More frequent inspections might be necessary if you live in a particularly humid or corrosive environment.
Cleaning should be done during each inspection.To clean the switch, start by disconnecting the battery cables from the switch. This is a crucial safety step to prevent accidental shocks. Then, use a wire brush or a suitable cleaning tool to remove any corrosion or debris from the terminals and the switch itself. A mixture of baking soda and water can be used to neutralize any acid buildup.
Once clean, apply a thin layer of dielectric grease to the terminals to prevent future corrosion. This grease helps repel moisture and keeps the connection clean and efficient. Finally, reconnect the battery cables, ensuring they are securely fastened.
Preventative Measures for Extending Battery Switch Lifespan
Several preventative measures can significantly extend the lifespan of your battery switch. First, always disconnect the battery cables when the trailer is not in use for extended periods. This prevents parasitic drain and reduces the risk of corrosion. Second, make sure the battery switch is correctly sized for the amperage of your electrical system. Using an undersized switch will cause it to overheat and fail prematurely.
Third, choose a high-quality battery switch made from durable materials. Look for switches with weatherproof enclosures to protect them from the elements.
So, you’re planning a trip? Awesome! Don’t forget travel insurance! Check out Aon travel insurance for comprehensive coverage. They’ve got options for everything from lost luggage to medical emergencies. And if you’re looking for a bit more focused coverage, perhaps for adventure travel, Aon travel insurance might have a specific plan tailored to your needs.
Comparing both is a smart move before you book that flight!
Annual Battery Switch Inspection Checklist
Before starting any inspection or maintenance, always ensure the battery is disconnected to avoid electrical shock.
- Visually inspect the switch for any signs of damage, such as cracks, loose parts, or corrosion.
- Check the battery cables for corrosion, looseness, or damage. Tighten any loose connections.
- Clean the switch terminals and battery cables with a wire brush and baking soda solution.
- Apply a thin layer of dielectric grease to the terminals to prevent corrosion.
- Test the switch operation by turning it on and off, checking that the power flows correctly to the system.
- Inspect the surrounding area for any signs of water damage or other potential problems.
- Document any findings or repairs made.
Upgrading or Replacing a Battery Switch
Your travel trailer’s battery switch is a crucial component, ensuring safe and efficient power management. Over time, it can wear out or become insufficient for your needs, necessitating replacement or an upgrade. This section guides you through the process of selecting and installing a new switch, considering both straightforward replacements and advancements to improve your RV’s electrical system.Replacing a faulty battery switch is a relatively straightforward task, but careful planning ensures a smooth and safe operation.
Choosing the right replacement depends on your trailer’s specific electrical demands and your desired level of control.
Selecting a Replacement Battery Switch
The correct replacement battery switch should match the amperage rating of your existing system. Check your current switch for its amperage rating (usually printed on the switch itself). This ensures that the new switch can handle the electrical load without overheating or malfunctioning. Consider the number of batteries you have – a switch with appropriate terminals is necessary.
For example, if you have two batteries, you’ll need a switch with at least two terminals for each battery. Some switches offer additional features like an integrated circuit breaker, which provides extra protection. Finally, check the physical dimensions to ensure compatibility with your existing installation.
Replacing a Faulty Battery Switch
Before starting any electrical work, disconnect the negative battery cable to prevent accidental shorts. This is a crucial safety precaution. Carefully note the wiring configuration of the old switch before disconnecting any wires. Take pictures or make a detailed diagram; this will save time and prevent errors during reinstallation. Once the wires are disconnected, remove the old switch.
Clean the mounting area to ensure a secure fit for the new switch. Mount the new switch, ensuring it’s securely fastened. Connect the wires to the new switch, following your diagram or pictures precisely. Double-check all connections before reconnecting the negative battery cable. Test the new switch to confirm functionality.
Upgrading to a More Advanced Battery Switch System, Battery switch on travel trailer function
Upgrading your battery switch can enhance your RV’s electrical system. Consider a switch with more advanced features, such as a digital display showing battery voltage, or a remote-controlled switch for easier access. Some newer switches incorporate smart features that can be monitored and controlled through an app on your smartphone. These offer benefits like remote battery monitoring, allowing you to check your battery levels even when away from your trailer.
Another upgrade option is to install a battery disconnect switch with a key lock, providing added security. For trailers with multiple batteries, consider an advanced system that allows for individual battery control or isolation, facilitating easier troubleshooting and maintenance. Upgrading also allows you to increase your amperage capacity if you add additional power-hungry appliances. For example, upgrading from a 75-amp switch to a 100-amp switch can provide sufficient capacity for added solar panels or inverters.
Mastering your travel trailer’s battery switch is about more than just turning power on and off; it’s about understanding your RV’s electrical system and ensuring safe and efficient power management. By following the advice in this guide – from regular maintenance to effective troubleshooting – you can extend the life of your battery switch and prevent costly repairs. Hit the road with confidence, knowing you’re in control of your power!
Key Questions Answered
What happens if I leave my battery switch on all the time?
Leaving your battery switch on constantly can drain your batteries, especially if you have parasitic draws from devices left plugged in. This can lead to dead batteries and potentially damage your electrical system.
How often should I clean my battery switch?
Inspect and clean your battery switch at least once a year, or more frequently if exposed to harsh elements. Use a wire brush and baking soda solution to remove corrosion.
Can I use any type of battery switch in my travel trailer?
No. The appropriate battery switch depends on your trailer’s electrical system and battery setup. Consult your owner’s manual or a qualified RV technician to determine the correct type.
My battery switch is making a clicking noise. What’s wrong?
A clicking noise often indicates a weak battery or a problem with the switch itself. Check your battery voltage and inspect the switch for loose connections or corrosion. If the problem persists, consult a professional.
